I’ve done this a few times now and each time I piece the answer together from forum posts and trial & error… that’s my indicator the internet is missing a good how-to tutorial 😃
Quick Intro
Ubiquiti UniFi is a line of networking equipment. It’s popular with ”prosumers” who often use it to run services like websites, home automation, etc. on their residential network.
One peculiarity of that setup is that residential internet connections typically have a constantly changing (dynamic) IP address instead of static. Dynamic DNS (DDNS) services allow you to sync a domain (ex. google.com) with this address so you only have to memorize the domain instead of a new number sequence every time it changes.
Namecheap is a domain registrar that provides DDNS services to its customers, and UniFi supports Namecheap out-of-the-box. All that’s needed is the right combination of settings!
How-To
Prerequisite
You have to have a Ubiquiti Unifi Security Gateway in your setup for this to work. That’s the machine where the DDNS client software operates.
Step 1
Set up a Dynamic DDNS record for domain if you haven’t already using Namecheap’s tutorial
Step 2
Take note of the subdomain (if any) (ex. house) and the Dynamic DNS Password (ex. YOUR_DYNAMIC_DDNS_PASSWORD)
Step 3
In UniFi, go to Settings → Services → Dynamic DNS. If you’re using the new Settings meeting, go to Settings → Gateway → Dynamic DNS. Create a new entry.
Step 4
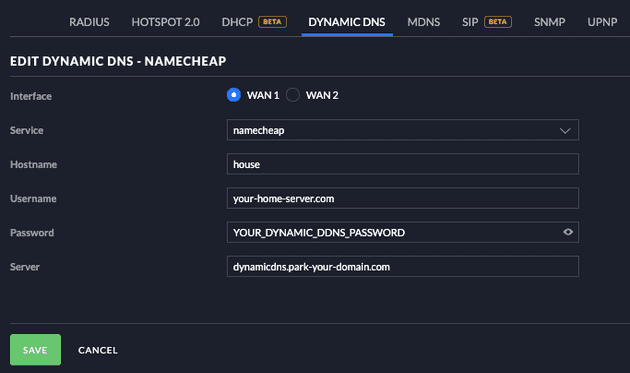
Here are the settings you’ll need:
Service: namecheap
Hostname: If you’re using a subdomain, this is the first segment (ex. for house.your-home-server.com, use house here). If you’re using the top-level domain (ex. your-home-server.com), put @ (or * depending on your UniFi Controller version).
Username: For Namecheap, this is the top level domain with no subdomain (ex. your-home-server.com). Other DDNS services may give you a specific username (ex. YOUR_DYNAMIC_DNS_PASSWORD)
Password: This is the password from the Namecheap settings (ex. YOUR_DYNAMIC_DNS_PASSWORD)
Server: I found this from other Namecheap tutorials:
dynamicdns.park-your-domain.com
Here’s what configuring a house’s USG to update house.your-home-server.com would look like:
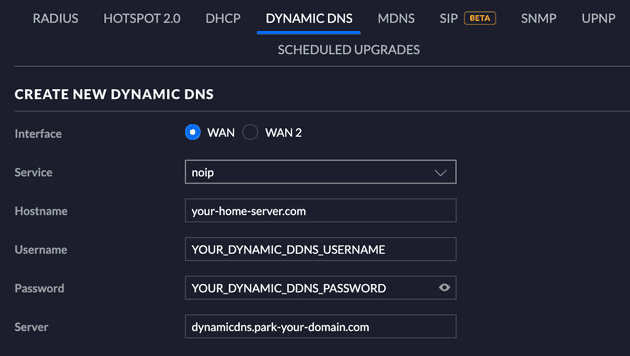
If you’re using another DDNS, like NoIP, that gives you an explicit username, use that instead of the TLD for “username” (thanks for the tip, R!):
Step 5
That’s it! It might not work immediately – that’s the nature of DNS. It may take a while to propagate changes. However, there are ways to speed this process up.
Speeding Up Propagation
Part of this process involves logging into the USG via SSH. If you aren’t sure of your credentials you can find them in UniFi → Settings → Site → Device Authentication.
SSH into the USG and force a DDNS update
The USG will only update Namecheap when it detects an IP change. You can manually kick this process off over SSH (the tutorial is for EdgeMax, but it’s the same for UniFi as it’s built on top of it):
# Status just after configuring DDNS:

admin@ubnt:~$ show dns dynamic status
interface    : eth0
ip address   :
host-name    : house
last update  : Wed Dec 31 19:00:00 1969
update-status: failed

# Manually kicking off an update:

admin@ubnt:~$ update dns dynamic interface eth0

# Status after kicking off an update (may take a few minutes):

admin@ubnt:~$ show dns dynamic status
interface    : eth0
ip address   : 8.8.8.8
host-name    : house
last update  : Sat Jun 29 14:48:58 2019
update-status: good
Clear the DNS cache on the USG
SSH into the USG and run these commands:
admin@ubnt:~$ sudo /etc/init.d/dnsmasq force-reload
[ ok ] Restarting DNS forwarder and DHCP server: dnsmasq.
Clear your browser’s DNS cache
Browsers like Google Chrome also have a local DNS cache you may need to clear. If you’re using Chrome, you’ll find it by navigating to chrome://net-internals/#dns.
That’s it!
You should soon be able to locate your home network on the internet using the domain.


